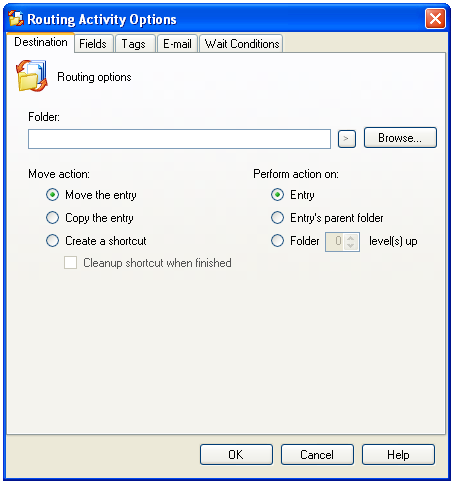
Destination Tab
This  tab contains routing options for the Route Entry to Folder activity. All settings in this tab must be configured.
To open the Destination tab
- Add the Route Entry to Folder activity to your workflow definition by dragging it from the Toolbox Pane and dropping it in the Designer Pane.
- Select the activity in the Designer Pane.
- Under Routing Options in the Properties Pane, click any of the setting's icons to open the Routing Activity Options dialog box.

- Select the Destination tab.
To configure the Destination tab
- Under Folder, click Browse to specify where the entry will be moved to. You can also manually enter a folder path. Entries can only be moved to a location in the repository specified. If you do not define a destination folder, the entry will remain in its current location. Click
 to use tokens.
- Under Move action, select the type of action to be taken.
- Moving the entry will relocate it.
- Copying the entry will duplicate the entry.
- Creating a shortcut will place a shortcut to the entry in the destination specified. Select Cleanup shortcut when finished for the shortcut to be deleted at the completion of the workflow.
- Under Perform action on, select which entry this activity will be performed on.
- Select Entry to perform this activity on the entry that starts the workflow.
- Select Entry's parent folder to perform this activity on the folder that contains the entry that starts the workflow.
- Select Folder _ level(s) up to perform this activity on a folder that is a parent, but not the immediate parent, of the entry that starts the workflow. Enter the number of levels desired. Give me an example.
Example: If the Finances folder contains the Tax Documents folder, and the Tax Documents folder contains the 2007 Taxes document, the Finances folder is a parent, but not an immediate parent, of the 2007 Taxes document. In this example, the Finances folder is two levels up from the 2007 Taxes document.